Showing posts with label holiday fun. Show all posts

Saturday, October 29, 2016

Our Halloween Gathering of 2016


 A Nightmare Before Christmas party

This year we opted for a fun Nightmare Before Christmas Party :) We immediately began to look for props and look for ideas. We found a cute printable banner and wreath ideas on Pinterest. I created the invitations using clip art and the free Nightmare Before Christmas font that I found here
We decided to have guests bring their flashlights and after creepy crafts we watched the movie and then headed outside for a themed scavenger hunt and flashlight tag!

I made a cute little Zero ghost out of pipe cleaners, cheap white fabric, cheesecloth, stuffing, and felt and small imitation pumpkins. Here he is! I love him. there are various tutorials out there but I just looked at a picture and "winged" it. (No pun intended). 
The printable banner was found here. Sally's recipe book tutorial was found here. This woman has so many great ideas and tutorials! She even has things for sale! Be sure to check her out! Her stuff is amazing! She also has free printable labels for Sally's potion jars. I bought glass and plastic jars and sprayed them a matte black then glued the labels to them. 
I was sure to get plenty of gummy worms (Oogie Boogie's Bugs), Twizzlers for Sally's hair, chocolate Chex mix with white chocolate chips for Zero's Kibble, and made little Zero cupcake toppers from fondant. I also made a great cake with jack's face and bowtie. I scanned cyberspace for ideas and settled on combining a bunch of different ideas. 

I used a black tablecloth that I cut into strips and put it across our sliding door as a curtain. I used white foam to cut out 3 skulls and used a sharpie marker to draw Jack's face and placed them in the center and sides of the curtains to hold them open. Zero was put by our slider to the backyard and I hung various purple lights and decor outside.  I got black spiderweb plates, napkins, and orange cups. Purple flatware was placed in black containers and I got a cheap black plastic cauldron and two plastic web bowls for three dollars each at stop and shop that completed the look.

The scavenger hunt cards I created and have shared them with you! Please remember to give me credit for them! Also, I have included the invitation card covers that I used. I got black cards and envelopes and glued on the inner portions and using white gel pens, wrote the guest's names and addresses on them. 
Savenger Hunt Printables
Invite Cover

The invites came out so great!!! 

For food, I made a Jack Skellington cake and used an idea found on Pinterest (I LOVE that site!) that used melted marshmallows strung around the cake to look like spiderwebs! So cute! Twizzlers were "Sally's Hair", and we had "Boo Cheese", pumpkin dip served with apples and graham crackers, little clementine oranges, Oogie's Bugs which were sour gummy worms, pizza, salad, a veggie platter, witch's hat cupcakes, and pulled pork and meatball sandwiches. We also had monster donuts (I took vampire teeth and put them in the center of them) and Caramel Apple Sangria for the adults. The table came out amazing and because I ran out of time, I realized I never took a picture of it set up! I am so disappointed, but it looked amazing- trust me. I do have pictures of the rest of the decorations though and the cake and cupcakes- at least I have those.

The kids arrived and we set them up to do a craft downstairs. 

After that, we had pizza and watched the movie, "The Nightmare Before Christmas". Since it was raining that day, I was unsure if we could do the scavenger hunt, but after the movie, we were able to do it. I hid the items during the movie and then gave 6 cards to the kids and as each item was found, the next child read their card. We then played "Pin the nose on Zero" and used the mayor's pumpkin tie as a blindfold. The kids loved it. We did have plans to do a pumpkin ring toss with glow stick rings and a pumpkin but the kids opted for a double feature instead and "Hotel Transylvania" was shown instead. Finally, flashlight tag was played outside when it got dark and they had a blast! Overall, they were amazing and everyone had fun!

Enjoy!!


Sunday, January 18, 2015

A Mother and Daughter's Letters to Santa Brunch!

This year I decided to throw my little snow bunny a Mother and Daughter "Letters to Santa" brunch. I also thought it would be sweet to invite the other little girls she is close friends with and their mothers as a nice late morning/early afternoon gathering.

I found a cute little white metal mailbox from Oriental Trading Company and created the cutest little invitations that looked like postcards! The printable can be found here. The color theme was white, red, and blue with pine and brown paper accents. I found these gorgeous letters to Santa place mats from Pottery Barn and thought they would go perfectly with the theme for the party! This is why I love to plan ahead! Ha!

So, we decorated the table with brown paper and used stamps to stamp cute decorations all over it in red and black ink. Kayleigh had a blast making the table cover. We had brown paper packages with ribbon and string for decorations and used the sparkling white snow globe that I had from the North Pole Party last year as part of the décor too. I used my little white tabletop tree and printed out the cutest "Dear Santa" letterhead! The kids took turns at the letter station writing their letters to Santa and had fun with the "Reindeer Games" that were set up to play with.


As favors, I made little elves for the kids to take home. I made little name tags featuring names of elves for the kids to chose from when they arrived at our "Elf Adoption Center" such as Icicle, Candy Cane, Sprinkles, Snowflake, Peppermint, Elfie, Lucky, Kringle, Elfie, Sparkle, Creampuff, Blizzard, Rice Krispie, Jolly, Jack, Chip, and Jingle. You can find this printable here.

I made the elves using a pattern that I found on craftsy.com and they came out amazing! Kayleigh chose hers right away and each child received an Adoption Certificate with their little elf. These were the favors at our little party. Little packages of "Elf Pillows" were there to take with the little elves.


This is a picture of the Elf Adoption Certificate! It came out really cute. 

You can find a printable located here. As with all available printables, please remember to cite where it came from (Me!) Thanks. In addition to the elves, each child was given an "Elf Care Package" complete with packets of Elf Pillows and Magic Candy Cane Seeds. The printables can be found by clicking the link!

We also had plenty of goodies and a cookie decorating station too! What yummy creations!


Here are some of the pictures from the party! Enjoy!


I hope you enjoyed this party blog! We had a great time and feel free to comment below!


Ariane :)


Monday, March 3, 2014

St Patricks Day Play Dough!

So I tend to be a planner- well that is an understatement. I have been trying to prepare for a wonderful St. Patrick's Day. We have our Leprechaun House all decorated and our Leprechaun Trap ready to go. The shoes are going to be placed by the door and I can't wait to see what kind of shenanigans those Leprechauns bring! Green milk and green pancakes/ yogurt are on the menu for breakfast and possibly a rainbow cake for dessert after dinner that night. The creative possibilities are endless! I might even have the little neighbor next door come over for a treat later on after school.

I have been cooking up wonderful home-made play doughs and have decided that I prefer the cooked dough to the kind of recipe where you add boiling water and stir. I feel that the glutens in the flour work better when cooked and the result is a better put together kind of play dough that is not too dry or crumbly or sticky. Some recipes call for the food coloring and glitter (if adding) to be added after the cooking process and be kneaded into the dough. That is fine and dandy, but I tried a different way.

I added the food coloring and the glitter while mixing the ingredients in the pot BEFORE cooking them. It came out beautifully! I could adjust the depth of the color and the level of sparkle. As it cooked the color deepened and the bling, well it was awesome. My pictures do not do it justice.  I used the following recipe from The Tinker Lab and it is really great!

The Best Play Dough Recipe

Supplies
  • 2.5 cups water
  • 1 1/4 c. salt
  • 1 1/2 tbsp. cream of tartar
  • 5 tbsp. vegetable oil
  • 2.5 cups flour
  • Food coloring or liquid watercolors. 
She suggests Wilton food colors but I used other kinds and it was still gorgeous.
 
Mix everything but the food coloring together in a large pot until somewhat smooth. It will be lumpy. Not to worry, the dough will get smoother as it cooks. *** Cook the dough over a low heat. Mix frequently. The water will slowly cook out of the mixture and you’ll notice it starts to take on a sticky dough appearance. Keep mixing until the edges of the dough along the side and bottom of the pan appear dry. Pinch a piece of dough. If it’s not gooey, the dough is ready. Store the dough in a large Ziplock bag or sealed container. Unused, it’ll keep for months.

*** I want to add that this is where I put in the food coloring and the glitter. It saves time and keeps things less messy all around. The end result is the same and I used green food coloring and gold glitter. Gorgeous!!!

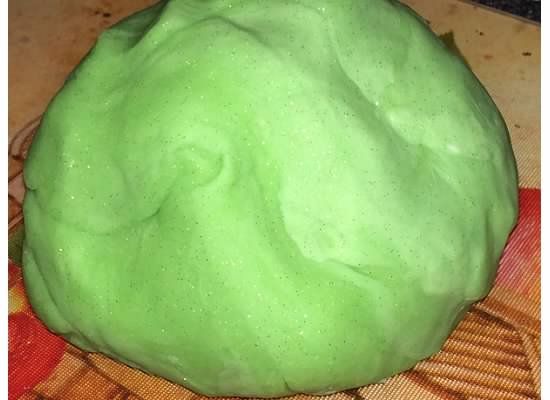
Here is my dough!!!


It is really hard to see the gold glitter but it shimmered constantly from every angle. The finer the glitter the more "Tinker Bell-ish" it looks and I LOVE it!
 
Our little Leprechaun is going to bring it to Kayleigh for St. Patrick's Day. I figured I would help him as I worry about his safety with the stove. Those little guys also make a mess! Always good to stay on his good side- don't want to get pinched.
 
Don't forget to join the google member board! It's getting lonely here with just little ol' me! Please feel free to leave a comment too! I'd love to have requests for party ideas or crafts!
 
Happy St. Patrick's Day!
 
Ariane :)

Tuesday, December 24, 2013

Elf Shenanigans 2013- Part 3!

So our cute little elves decided to try to pack Kayleigh's lunch on Sunday the 22nd, not realizing that she would be on vacation! Selsie chose marshmallows, Christmas tree cakes, and chocolate chip muffins. Kayleigh kindly thanked him and proceeded to ask me if she could eat it anyway.  Oh, dear.


That night, the girls had a sleep over under the Christmas tree. Tis the season for making memories, right? Who wouldn't want to do that?! The elves were pretty tired after their flight back from the North Pole, so they ransacked my sock drawer and found my fluffy, comfy, cozy red and white striped socks. They used these as sleeping bags and joined the girls that night in the living room. So cute!


Today, the elves brought Kayleigh a great gift from them. A baking set complete with a cute elf chef hat and apron that said, "I love my family" and Kayleigh's said, "I love my elf". She adored it and quickly made plans to make them their favorite cookies.


Tonight the elves fly back to Santa and it seems that the holiday season flew by even faster this year for some reason. Maybe because Thanksgiving came later. In any case, it went too fast. Just like Kayleigh is growing up too fast. I can't believe six years have gone by so quickly. That is why I write to her and journal and blog and create beautiful photo books. These memories are what is important- not the gifts or the money or the house or the clothes- but these wonderful times together that will live on and on and possibly become traditions she will use one day. Life is often short on magic but with a little luck and Magic Elf Dust, that can be changed.  Have a very Merry Christmas from my family to yours!

Sugar Plum Fairy and Gingerbread Party             

December 21st, 2013

This year I had a blast planning a Sugar Plum Fairy/ Gingerbread Party for Kayleigh and a few of her closest friends. We chose a light pink, lavender, and white color scheme with gingerbread brown to compliment the gingerbread theme.  I planned the party the first Saturday of the Winter Vacation for about 2-3 hours. I invited 5 little girls and planned on a small gathering.  Parents of course, were always more than welcome to drop off or stay. 

The Planning:

I had gone back and forth about whether to have real gingerbread houses to decorate but also wanted them to be a keepsake, so I settled on purchasing wooden birdhouses for about $1 each at AC Moore and painted them brown. I used real candy such as peppermints, nonpareils, licorice, gum drops, spice drops, Necco wafers, and royal icing to stick it all on. I purchased little Wilton squeeze bottles in packs of 2 for about $1.99 at Christmas Tree Shops to dispense the royal icing. I figured that I could spray them with clear lacquer and they would not spoil. 

For the table scape, I found a beautiful idea here.

From JoAnn’s I bought shimmery white and lavender floral picks, some vases, and Epsom salts and created an adorable centerpiece. I also bought shimmery lavender satin fabric to pair with a sheer shimmery white snowflake fabric to use as an overlay tablecloth, and a white snowflake pattern fabric for another tablecloth.

I wanted to have cute place settings for each girl so I found shimmery lavender and pink 12 x 12 scrapbook paper squares that I decorated with snowflake stickers and laminated so they could be reused. From Oriental Trading Company I purchased pink aprons and a gingerbread garland. I cut the gingerbread boys and girls from the garland and hot glued them to the aprons. Now I had cute aprons for the girls to wear while they decorated their houses! I also purchased little marshmallow pop ups and mini white popcorn boxes from there to decorate and hold the candies at each decorating station.

I found a beautiful pink peppermint nutcracker on Amazon and also purchased pink and white and mint green and white striped straws to use as actual straws or for part of my dessert table. I found pink and white marshmallows and peppermints, and various table items of cupcake liners, plates, flatware, pink and purple swirl lollipop ornaments, and other decorations to make this a winter wonderland.  Add a roll of Buffalo snow and it was complete.

I looked around local supermarkets and came across those pink snowball desserts and thought, “Perfect! What a great dessert idea!” I also decided the party fare would include snowflake sugar cookies, white chocolate snowflakes, cupcakes decorated with little gingerbread men, hot cocoa, milk, and “ice water”. 

I found these adorable invitations on Zazzle.com hereThey came out perfect and complimented the theme so well.  I put little white shimmer snowflakes in the envelopes to add to the magical effect.

I also bought a wooden letter “K” and a small square plaque that I painted shimmery pink and shimmery white. I hot glued the K to the stand and figured I could use that as part of a centerpiece for this party and for future parties.

I found the cutest pink and white printables here for the party labels.

One of my friends, whose daughter is friends with Kayleigh, found these cute fairy wings that she thought would be perfect for the party too. I set out little pink and purple tutus that the girls could wear as part of their “Sugar Plum Fairy” attire too. These I plan to reuse for Kayleigh’s “Under the Sea Mermaid Party” for her 7th birthday this year.  Knowing a party theme ahead of time sure helps with bargain shopping because I love to raid the clearance sections of local stores to see what I find. Saves money, keeps it fun for planning purposes, and who wants to spend full price for anything anyway?


The Party:

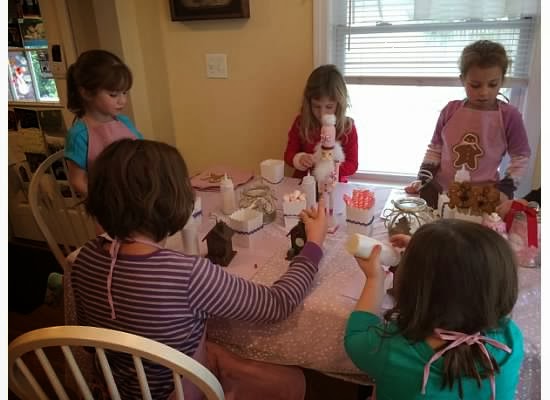
The girls arrived and donned their “Fairy Attire” at the Sugar Plum Fairy Boutique.  I put on some Sugar Plum Fairy music and the girls had fun dancing around the living room. I set the kitchen table with the pretty table cloth, place settings, mini popcorn buckets full of candies,  icing bags of royal icing to use as “glue” and the painted bird houses at each place setting.  The girls donned their aprons and set to work constructing their masterpieces. What fun we all had! 


We decorated them first to give them time to try before the girls took them home.
Party fare included pink coconut "snowballs", gingerbread cookies, hot cocoa on a stick or in the carafe, peppermint whip with Pirouline wafer cookies, cupcakes with little gingerbread icing decorations, and other confectionary delights. "Fairy Water" was also available and some wine for the "Sugar Plum Fairy Mothers".


The girls were so cute dancing around for a game of Sugar Plum Fairy Freeze Dance! They loved wearing the fairy wings, tutus, and gloves that we got!


Please be sure to check out my Sugar Plum Fairy Gingerbread Party Inspiration Board on Pinterest here.

Enjoy!!

Ariane